キラキラ系エンジニアへの第1歩 2日目(AWS基礎の基礎。Webアプリ基本構成 Part2)
キラキラ系エンジニアとは
こちらを参照ください。
今日のアップデート
前回は、基礎の基礎としてWebアプリケーションの基本構成の先っちょを学んでみました。
そのままもう少し前進してもよいかと思いましたが、
今回は、AWS無料枠を利用して実際にTerraformでWebアプリケーション構築のやり方の先っちょを学んでみたいと思います。
Terraformとは
- インフラ構成をソースコードで管理できる
- 拡張子がtfのファイルを作成します。
- AWS、GCP、Azure等いろいろ利用できるようです。
- HCLという言語使い記述するらしい
以下を参考に進めます。
| https://udemy.benesse.co.jp/development/system/what-is-terraform.html#:~:text=Terraform%E3%83%95%E3%82%A1%E3%82%A4%E3%83%AB%E3%82%92%E4%BD%9C%E6%88%90&text=Terraform%E3%83%95%E3%82%A1%E3%82%A4%E3%83%AB%E3%81%AB%E3%81%AF%E3%80%81%E3%83%AA%E3%82%BD%E3%83%BC%E3%82%B9,%E8%A8%80%E8%AA%9E%E3%81%A7%E8%A8%98%E8%BF%B0%E3%81%97%E3%81%BE%E3%81%99%E3%80%82 |
| https://www.isoroot.jp/blog/4584/ |
provider.tfを作成する
どのプロバイダ(AWS or GCP or Azure・・・)を使用するかを記述します。
provider "aws" {
  region  = "ap-northeast-1"
  access_key = "xxxxxxxxxxxxxxxxxxxx"
  secret_key = "xxxxxxxxxxxxxxxxxxxxxxxxxxxxxxxxxxxxxxxx"
}
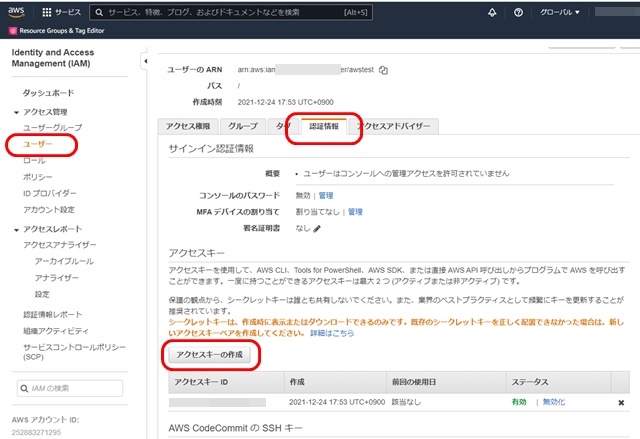
AWSを使用する。リージョンは東京。アクセスキーとシークレットキーは、ユーザー作成時に確認できます。

なお、シークレットキーを忘れたら再度アクセスキー作成を行う必要があるようです。
aws_vpcを作成する
#=========================================================
#VPCの作成
resource "aws_vpc" "dev-vpc-main" {
  cidr_block           = "10.0.0.0/16"
  enable_dns_hostnames = true
}
#=========================================================
#サブネットの作成
resource "aws_subnet" "dev-subnet-public-1" {
  vpc_id                  = aws_vpc.dev-vpc-main.id
  cidr_block              = "10.0.1.0/24"
  availability_zone       = "ap-northeast-1a"
  map_public_ip_on_launch = true
}

resource "aws_subnet" "dev-subnet-public-2" {
  vpc_id                  = aws_vpc.dev-vpc-main.id
  cidr_block              = "10.0.2.0/24"
  availability_zone       = "ap-northeast-1c"
  map_public_ip_on_launch = true<br>}

resource "aws_subnet" "dev-subnet-private-1" {
  vpc_id            = aws_vpc.dev-vpc-main.id
  cidr_block        = "10.0.11.0/24"
  availability_zone = "ap-northeast-1a"
}

resource "aws_subnet" "dev-subnet-private-2" {
  vpc_id            = aws_vpc.dev-vpc-main.id
  cidr_block        = "10.0.12.0/24"
  availability_zone = "ap-northeast-1c"
}
#=========================================================
#インターネットゲートウェイの作成
resource "aws_internet_gateway" "dev-igw-main" {
  vpc_id = aws_vpc.dev-vpc-main.id
}
#=========================================================
#ルートテーブルの作成
resource "aws_route_table" "dev-rtb-public" {
  vpc_id = aws_vpc.dev-vpc-main.id
  route {
    cidr_block = "0.0.0.0/0"
    gateway_id = aws_internet_gateway.dev-igw-main.id
  }
}

resource "aws_route_table" "dev-rtb-private" {
  vpc_id = aws_vpc.dev-vpc-main.id
}
#=========================================================
#ルートテーブルをサブネットに設定
resource "aws_route_table_association" "public-1" {
  subnet_id      = aws_subnet.dev-subnet-public-1.id
  route_table_id = aws_route_table.dev-rtb-public.id
}

resource "aws_route_table_association" "public-2" {
  subnet_id      = aws_subnet.dev-subnet-public-2.id
  route_table_id = aws_route_table.dev-rtb-public.id
}

resource "aws_route_table_association" "private-1" {
  subnet_id      = aws_subnet.dev-subnet-private-1.id
  route_table_id = aws_route_table.dev-rtb-private.id
}

resource "aws_route_table_association" "private-2" {
  subnet_id      = aws_subnet.dev-subnet-private-2.id
  route_table_id = aws_route_table.dev-rtb-private.id
}
#=========================================================
#SGの作成
resource "aws_security_group" "dev-sg-elb" {
  name   = "dev-sg-elb"
  vpc_id = aws_vpc.dev-vpc-main.id
  ingress {
    from_port   = 80
    to_port     = 80
    protocol    = "tcp"
    cidr_blocks = ["xxx.xxx.xxx.xxx/32"]
  }
  egress {
    from_port       = 80
    to_port         = 80
    protocol        = "tcp"
    security_groups = [aws_security_group.dev-sg-ec2.id]
  }
}

resource "aws_security_group" "dev-sg-ec2" {
  name   = "dev-sg-ec2"
  vpc_id = aws_vpc.dev-vpc-main.id
}
resource "aws_security_group_rule" "dev-sg-ec2-rule-1" {
  type                     = "ingress"
  from_port                = 80
  to_port                  = 80
  protocol                 = "tcp"
  source_security_group_id = aws_security_group.dev-sg-elb.id
  security_group_id        = aws_security_group.dev-sg-ec2.id
}
resource "aws_security_group_rule" "dev-sg-ec2-rule-2" {
  type              = "egress"
  from_port         = 0
  to_port           = 0
  protocol          = "-1"
  cidr_blocks       = ["0.0.0.0/0"]
  security_group_id = aws_security_group.dev-sg-ec2.id
}

resource "aws_security_group" "dev-sg-rds" {
  name   = "dev-sg-rds"
  vpc_id = aws_vpc.dev-vpc-main.id
  ingress {
    from_port       = 3306
    to_port         = 3306
    protocol        = "tcp"
    security_groups = [aws_security_group.dev-sg-ec2.id]
  }
  egress {
    from_port   = 0
    to_port     = 0
    protocol    = "-1"
    cidr_blocks = ["0.0.0.0/0"]
  }
}
aws_elb.tf (ロードバランサー)を作成する
#=========================================================
#ec2の作成
resource "aws_instance" "dev-ec2-ap-1" {
  ami                    = "ami-09d28faae2e9e7138"
  instance_type          = "t2.micro"
  subnet_id              = aws_subnet.dev-subnet-public-1.id
  vpc_security_group_ids = [aws_security_group.dev-sg-ec2.id]
  user_data              = <<EOF
#! /bin/bash
sudo yum install -y httpd
sudo systemctl start httpd
sudo systemctl enable httpd
EOF
}

resource "aws_instance" "dev-ec2-ap-2" {
  ami                    = "ami-09d28faae2e9e7138"
  instance_type          = "t2.micro"
  subnet_id              = aws_subnet.dev-subnet-public-2.id
  vpc_security_group_ids = [aws_security_group.dev-sg-ec2.id]
  user_data              = <<EOF
#! /bin/bash
sudo yum install -y httpd
sudo systemctl start httpd
sudo systemctl enable httpd
EOF
}aws_rds.tf (mysql)を作成する
#=========================================================
#RDSの作成
resource "aws_db_instance" "dev-rds-db" {
  identifier             = "dev-rds-db"
  db_name                = "test"
  allocated_storage      = 20
  storage_type           = "gp2"
  engine                 = "mysql"
  engine_version         = "5.7"
  instance_class         = "db.t3.medium"
  username               = "hogehoge"
  password               = "examplepw"
  db_subnet_group_name   = aws_db_subnet_group.dev-subnet-group.name
  skip_final_snapshot    = true
  vpc_security_group_ids = [aws_security_group.dev-sg-rds.id]
}
#=========================================================
#DBサブネットグループの作成
resource "aws_db_subnet_group" "dev-subnet-group" {
  name       = "dev-subnet-group"
  subnet_ids = [aws_subnet.dev-subnet-private-1.id, aws_subnet.dev-subnet-private-2.id]
}
Cloud9でコマンドを実行する
- terraform init
- terraform validate
- terraform apply ※途中でyesを入力する
- terraform destroy ※リソースを削除する場合
の順で実行するようです。
ここを参考に進めましたが、途中で時間切れ。
以下課題です。
そもそも、tfファイルの中身を理解できていない。
terraform実行し基礎の基礎のWebアプリ環境が構築できてません。
また明日。
さくっと調べたいこと
- DX検定
- パワポに代わるもの
- 底辺系エンジニアのコミュニティってどうだろう
しっかり調べたいこと
- 5分又は10分LTのパワポ粒度とネタ
- Qiitaとブログの相互リンク
気になっているワード
- DX
- DX検定
- 統計学、Python検定
- ITストラテジスト
- 中小企業診断士
- データエンジニア
毎日言葉にして言います。
以下のことを毎日ペンでノートに書いて、口に出して言います。
- 今日の自分を明日の自分が超えていく
- 失敗、挫折してきたことは自慢できる
- 失敗を恐れない。成功ではなく成長にフォーカス。努力は100%自分を成長させる
- 3Y(よし!よっしゃ!やるぞ!)
- 決して諦めない


ディスカッション
コメント一覧
まだ、コメントがありません